
This is a first – the first actual journal post on here. It’s a long one, too! This is a raw look into what it looks like to build out a food blog.
For those who are unfamiliar, this isn’t my first foray into food blogging. I got my start back in the early 2010s. Throughout the years, my culinary content creation has gone through several evolutionary iterations, and it’s interesting to me to reflect back on each of them and see how it’s progressed / they’ve differed. I’m proud of how each one has been a further honing toward an incrementally more authentic, dialed-in approach.
As much as food blogging itself is a creative endeavor on a micro level – writing the individual articles, recipes, and all else – so too is the crafting of the blog concept, theme, identity, and all the larger overarching things on a macro level. While the articles and recipes have gotten better, the focus and direction and presentation of my ventures is what’s really gained momentum.
Over time the quality (I think) has improved, and the clarity of expressing my vision (I know) has improved. With where I am now, I am very happy, and excited for the future.
I’d like to take you through a quick overview of how this has evolved.
A Short Chronology
Let’s start at the beginning.
Back in the early-to-mid 2010s I blogged about food under a general broad lifestyle blog that had fashion, home, tech, and all kinds of other subjects.
The challenge – especially for creatives who have a number of different interests – is determining what areas of content might have meaningful overlaps or intersections, and what needs to be separate and delivered on its own. That initial foray into a combined approach was an enlightening experience in regards to that. While I enjoyed how inclusive the “all togetherness” of it was, I determined that it was a little too fragmented of an approach, and took a break for several years.
Several years later, during the pandemic I got back into writing with a more food-centered approach – no fashion, home, tech, etc – just food. While the blog was much more focused on food, it ended up being a little too focused. In time, my interest and drive waned – in retrospect – because it was too heavily focused on several niche diets that ultimately proved themselves to be irrelevant.
The Third Time’s the Charm
During summer of 2022, spurred on by what had been a longstanding interest, and a plethora of encouraging forces around me, I decided to explore a plant-based lifestyle. This event, while seminal in relation to what would eventually come of it,… as it pertains to the whole of what this is, was entirely separate from it.
There were multiple motivating reasons behind this shift; obviously animal welfare, but also the desire for a healthier diet, and just the overall sustainability of animal farming, too. While there was no direct mention of veganism in it, I just happened to watch Zac Efron’s “Down To Earth” series around that time, which had a lot of conversation around sustainability and kind of pushed me further to explore all of that.
After I began to see the environmental impact of farming animals for food – all the crops it took to feed them, and all the water it required to grow not only the crops but the animals too, it just didn’t make sense. If you look into it, and I’m not talking about reading someone’s point of view on something, but looking at irrefutable evidence, like measurements of water reserves in the Colorado River over the years, it’s kind of hard to ignore.

Since then I’ve stuck with it, and I’m very happy with it. Was it challenging initially? Yes, but only for about a month. Is it challenging in ways to uphold? Yes, but only if you rely on a lot of fast food / pre-packaged food.
Unfortunately the corporate fast and convenience food world has not caught up with things, but I am hopeful they will eventually. That being said, if you cook at home, the ironic thing is that it’s actually far easier than cooking a carnivore diet.
When you eat plant-based, the majority of what you eat can be bought shelf stable, and lasts for a long time. And obviously, while food safety standards should still be followed, there isn’t quite the same looming fear of food poisoning when preparing stuff, like, did I cook this long enough? Not to mention that, gram for gram, high-quality organic plant-based protein sources are the same price if not often quite a bit cheaper than the same animal protein sources.
The deeper that I got into it and the more I learned, the more I realized that I might just have something in all of that learning that’s worth sharing with others.
But I digress…
Fast Forward to Now
There was some time in between the switch to plant-based living and the creation of The Vegan Gourmand. It took a while for the opportunity to become clear to me. And though the idea for TVG came to me in May of 2023 and I purchased the domain then, I didn’t begin work on it until mid 2024. It’s been a very gradual thing, up until work actually started.
Since then, there have been I’d say three distinct stages of work:
- Framework – Building out the identity, branding, and setting up the basic parts of the website
- Gear – Determining and obtaining the necessary technological gear – cameras, lights, etc
- Environment – Building out an effective studio with all the right backdrops, props, and other things
The first stage began almost immediately.
While this is a continually evolving thing, I seem to recall, having started in spring of 2024, that I arrived at a satisfactory point of development somewhere around fall of 2024. Part of this stage also involved deciding what I want to offer in terms of content. This was really influential in determining the next stages and what exactly I’d do with all of that.
The second stage began in the fall of 2024 with a hefty amount of research into what gear to buy.
I’m a firm believer in the idea that great content starts with great equipment.
I have always felt that when you invest in high-quality equipment, you remove any perceived or actual handicaps. You end up freeing yourself to hone in on your opportunities for growth and development as a creative and not feel, wonder, or even know that there is something external to you hold you back. Investing in great gear removes many actual and imagined limitations. It puts the focus on you. It also encourages; there is nothing standing between you and what you want or see yourself becoming except the growth and learning necessary.
While it’s entirely possible to start with more basic gear, it can sometimes be discouraging when it affects the look of your efforts, and can cause you to second guess your ability. If, and it’s a big if, you are determined and certain this is what you want to do, investing in the better gear can provide a very encouraging boost. It has the effect, in my mind, of removing the static and noise if you will. It puts you face-to-face with all of your potential.
Now, with that being said, this is not a mandate / edict / license to deplete your life savings or go into massive debt to go buy Hollywood-level equipment. The law of diminishing return does not discriminate, and I’ll say that you reach a certain point in nearly any product line where what it costs to buy a better XYZ grows larger and higher in proportion to the benefits and dividends that the “better” product offers.
Finding the perfect in between and selecting the right type of camera took a little detective work.
Having worked with Sony gear in past, and being very happy with their products and familiar with the user experience, I decided to stick with what I knew. That narrowed it down quite a bit, it just came down to figuring out which one to get.
My criteria was simple; 4K resolution, 60fps or greater, and unlimited recording.
Even though I personally have no issue with 1080p video content (1920×1080) resolution – and most video content viewed on smartphones and tablets gets scaled down to that due to the inability of most devices to resolve 4K on their tiny screens – I wanted to film in 4K for posterity, and the important ability to crop in.
I also didn’t want to be limited to 30fps. While many cameras out there can do 60fps or greater, they struggle with overheating if used in that mode for very long. You can record for sometimes 15-20 minutes and at that point you get a quick warning, a few beeps, and then the shutter clicks, the camera shuts off, and you have to wait for it to cool back down. Having to manage that limitation and shoot in 10-15 minute segments just adds a layer of complexity to an already complex line of work.
The least expensive Sony camera that has absolutely zero issue with overheating is the FX30. This is because of the built-in cooling fan. The only problem for me is that it’s a crop sensor. For many people, that’s not an issue, but I felt like if I was going this far, I’d go ahead and get full frame. There’s a larger batch of lenses available, and full frame is typically known for doing better in low light situations, even though the FX30 does very well. There are a number of other small but incrementally-significant benefits to the FX3 over the FX30.
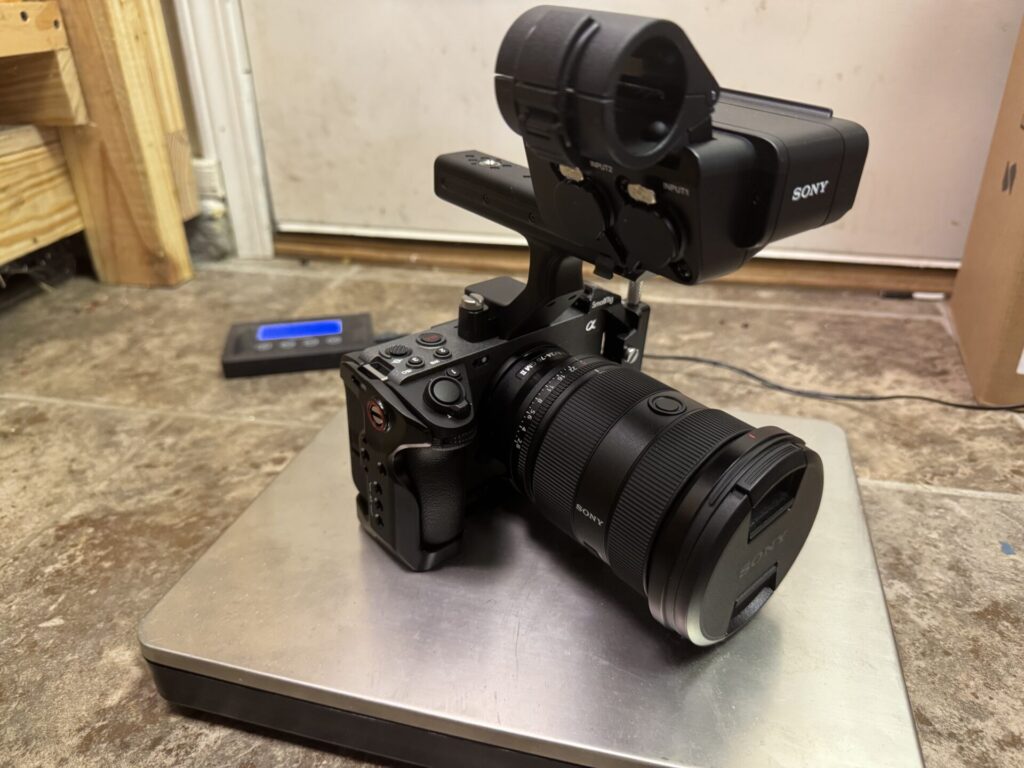
Since purchasing the FX3, I’ve been exceedingly pleased with it.
I selected the stunningly excellent Sony 24-70 GM II lens to go with this. For what I’m shooting, it gives unmatched quality, clarity, and excellent autofocus support for video. It also works equally well with the Sony A7R V that I decided on for my still photography. While the FX3 has a mechanical shutter and technically can shoot stills, they come out around 10-12mp, which is about the same as the average iPhone while looking far better, but still doesn’t give much room to work with.
Add to all of that Sennheiser MKH 416 running through a Tascam Portacapture X8 for audio, a couple Aputure constant LED video lights, some C-stands to set it all on, tripods, a teleprompter setup with a thin LED display on it, a Mac mini for powering that and doing live streaming from, and the necessary power and data hubs to connect it all.
That whole section is finished. Or is it?
Custom Design
While there were a lot of things I bought outright, there were a few here and there that I built on my own.
For photography, especially mobile stuff where you’re out and about, you want things to be as light as can be. For videography though, you’re capturing video and sound, which adds some complexity to things. With all the extra gear necessary, and the much higher power draw of video versus photo work, your setup tends to be a bit more bulky.
The solution is to get (or in my case build) a frame to mount everything onto.
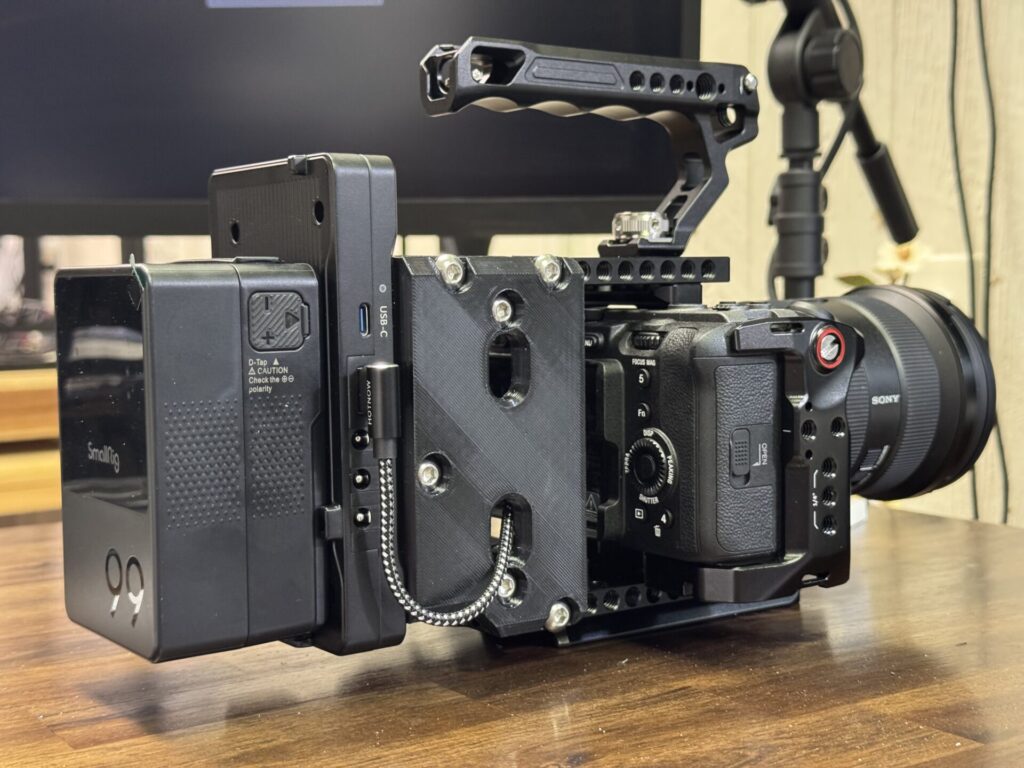
Building a custom rig for the Sony FX3 camera I got was a lot of fun, and made use of some CAD design and 3D printing skills I acquired several years back – something I spent a month or so designing and building in late 2024.
The finished product looked like this:

And here’s another angle showing the SmallRig battery plate mounted on the back of the 3D printed junction plates, and the SmallRig V-Mount battery that powers everything slid onto that. You can see one of the right-angle USB power cables coming out of the battery plate, heading through the rig, and over to the other side of the camera to keep the power topped off on the camera’s internal battery at all times.
Some might ask what purpose such a contraption serves. Great question!
It gives you the ability to combine the camera, your microphone, and a full battery pack that is capable of supplying power to the camera and any accessories, while also being charged at the same time to the whole system. It saves on the messy cable setup of having everything all separate, giving you something you can pick up by the handle on top and carry with you. Every hole you see on the top and bottom aluminum plates is a 1/4-20 threaded hole, useful for attaching any number of accessories you might need in the future.
For the most part, this marked the conclusion of the gear build out, on or around the end of 2024.
Lights, Camera, Ambiance
During the gear build-out but mainly afterward, the third and final task was to build out the studio. As is the case with almost every studio, you are in effect creating – within the confines of the camera’s view – a world that only exists to just beyond the margins of its view.
In food photography, and also product photography in general, backdrops and surfaces are a huge part of this.
Back during the last food blogging venture in early 2020, I made a small collection of custom photography backdrops, one of which you can see below.
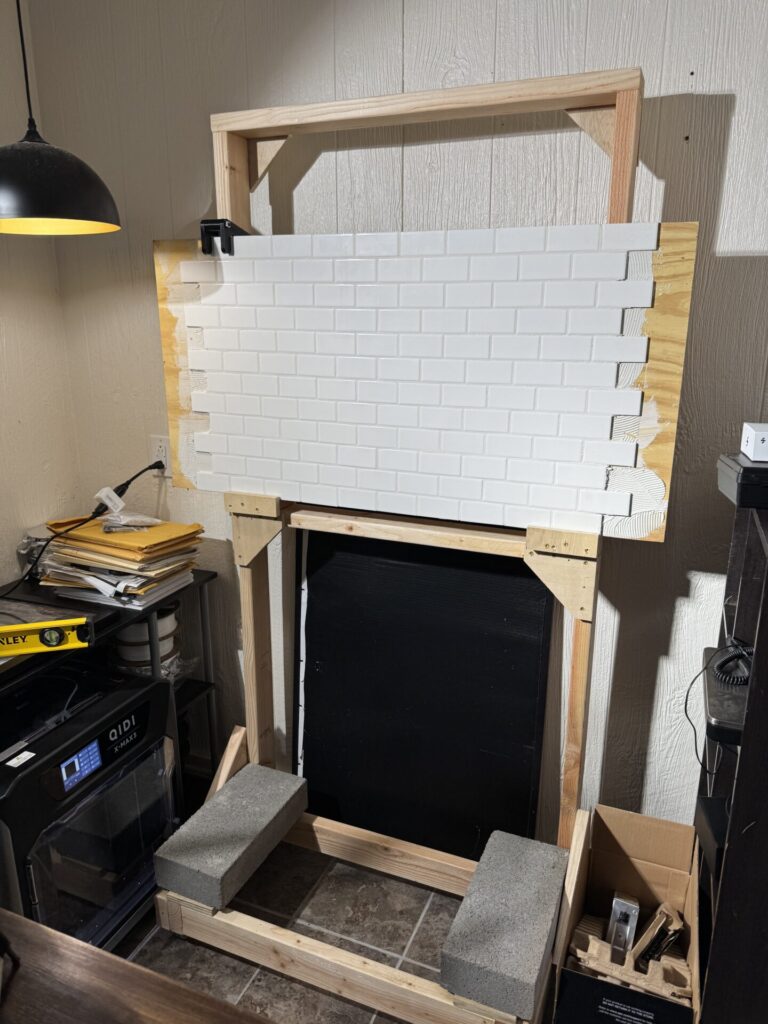
Though many people – whether out of a desire for simplicity, availability, or a lack of time and / or ability – choose to purchase ready-made printed backdrops and surfaces (like the ones from Replica Surfaces or V-Flat World), I decided to make my own, for a number of reasons I’ll go into briefly now.
Mass-Produced Surfaces
Finding backdrops and surfaces for photography isn’t the least bit difficult. They’re everywhere. Finding really good ones can be a bit of a challenge.
The two big companies producing the highest-quality backdrops are Replica Surfaces and V-Flat World. I’ll go on record right off the bat and say that they are excellent products. Aside from the price, which I feel is a little steep for what they are (and I’m not alone in that), they are fantastic, and unmatched in convenience.
But, they’re not right for everyone. In my case, they wouldn’t have delivered the type of experience and vision I had in mind. I’ll go into a little bit of the “why” behind it all, now.
Size
One of the chief concerns for me with ready-made solutions was size. Most of them are around 24″ x 24″ and while that’s a decent size, it doesn’t work for larger scenes. In the virtual world I’m trying to create, I don’t want to be limited by size, because that impacts the realism of things. It means that all of my photos are going to be detail shots, or be really zoomed in. This type of photography has a certain feel to it – it’s not portraying a real place; just somewhere kind of in between.
Part of my vision is transcending the stereotypical food photography language or look that we see in food magazines and websites to create something with a little greater ambiance to it, a more “real” feel, if you will. That might involve multiple dishes, an appliance of kitchen implement in the background, or any number of other things. I think in time as I begin to build a collection of these shots, you’ll see and understand what I’m talking about.
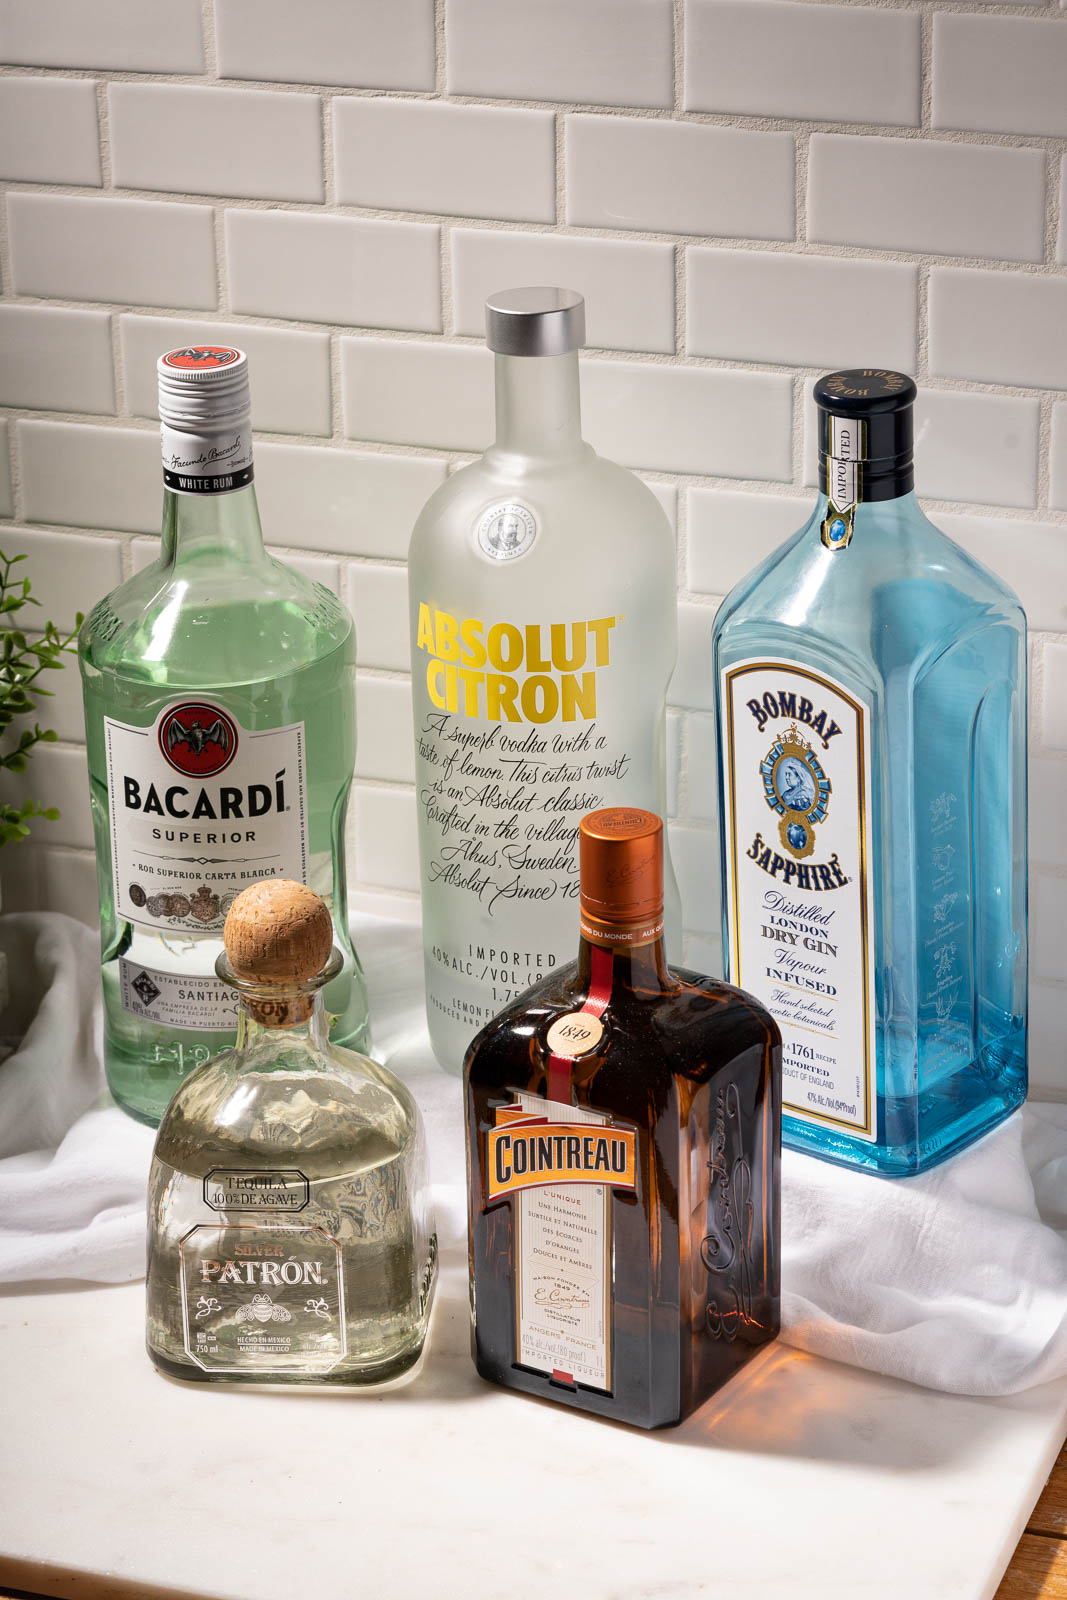
There’s a great example of that in this photo of liquor bottles. This is something that just barely fits in a 24” x 24” area. While the companies I mentioned do make larger versions in certain styles, they’re very expensive for the “close-but-not-quite-there” realism of them, which brings me to my next point.
Realism
Since they are printed, they lack the fine texture that a real surface has.
Don’t get me wrong – they are high resolution, they are matte and have virtually no glare, and they look great, but they are completely and totally flat. Look at the picture above, for instance – the subway tile on the back. Looks real, right? That’s because it is! If you have a backdrop that would normally have texture to it, your lighting will never “catch” right on it and create realistic shadows; same thing with a surface you place stuff on. They do a very good job on some of them of trying to in effect “print” a shadow or some sensation of depth into them, but the more the camera is shooting parallel to the surface, the less realistic it is. Being that I’m shooting with a camera that outputs 61 megapixels, detail is important.
Now, on the subject of megapixel count – some could argue that for a website that’s probably being viewed on a smartphone, a tablet, or even a laptop, you just don’t need that size. No argument there. What I’ll say is this; in spite of it seeming like overkill now, there is a benefit in getting high-resolution originals for the possibility of work down the road that might require higher resolution – like a book, magazine spread, or some other use.
It’s also great to have high-resolution pictures for the ability to crop in, if you need to do so.
Exclusivity
These printed backdrops also very common among food bloggers. Given that there are maybe two to three companies making these, it’s very possible for the backgrounds of your photos to end up looking like someone else’s photos.
Their selection is fairly robust, but also limited at the same time. Replica Surfaces likes to bring out limited edition runs of unique prints – which helps a little bit if your vision doesn’t fit the “safe” mold – that is, unless they’re sold out and you have to wait, hoping they’ll bring it back out. I know part of this is scarcity-selling, but part of it is also likely that they may be reluctant to print a huge run of a more specialty style print in fears it may not sell well – so I get it.
Authenticity
Along with the relatively small selection floating around out there, there’s the concern for me of authenticity, too. As I’ve alluded to and will probably address in greater detail in future posts, a big concern for me is remaining loyal to my vision and producing an authentic representation of that.
Both companies, in somewhat of a limited selection of surfaces, encompasses a wide variety of looks. For cosmetic and product photography, they’ve got it nailed, but when it comes to reproducing a very specific type of urban home setting in a very convincing and authentic manner – something you’ll see more about in the brick wall section toward the end of this article – they can’t quite provide that.
And it’s understandable – you can’t possibly be everything to everyone.
Handcrafted Backdrops and Surfaces
While making your own backdrops or surfaces takes time – and sometimes just as much (if not more) money – for me, it ultimately produces a superior product. One that likely has an infinitesimally small market, one that only a handful of people would actually pay for.
I am all about attention to detail. Always have been and always will be. These custom surfaces give me the ability not only to craft a highly detailed and realistic set of surfaces, but also create a virtual ambiance that is an authentic representation of my vision and my culinary style.
Whether it’s food, an electronic device, a car, or virtually anything else, the environment a product is photographed in matters. I like to think that it adds context and emotion to things. Environment is suggestive. Something like a bright, off white room with beautiful green bouquets of flowers and a gorgeous mahogany dining table gives a very different vibe from a concrete countertop awash in a narrow overhead spotlight with large warehouse style windows and vertically lit brick walls with ivy climbing them in the background.
It’s weird to say it, but the food isn’t enough on its own. Not quite. It needs the environment, and it must match whatever vision the individual putting it together has. That’s why I’ve spent so much time and painstaking attention on all of this. And, as it comes together, I think you’ll see the fruits of the labor.
At this point, some people might ask “why don’t you just photograph in your own kitchen?”
It’s a logical question, but when you see just how much lighting equipment, tripods, and other photography paraphernalia you need to get these kinds of shots, a separate studio where everything can remain set up really makes sense. Doing all of this in the kitchen would require a ton of setup and breakdown time, or a kitchen where you’re always dodging this or that piece of equipment.
It is amazing to me any time I see a studio kitchen just how much equipment there is behind the scenes to create what you see on the screen or in print that somehow looks so simple and natural.
The Studio Collection
Now, with all that being said, and several years in the past, let’s get to what’s been going on more recently.
Shortly before I finished the custom 3D printed rig, I started on the first of my more recent studio projects. In fact, I actually finished this one shortly before I finished the rig itself, as I remember taking my first photos of the rig on the finished project.
So, what was it?
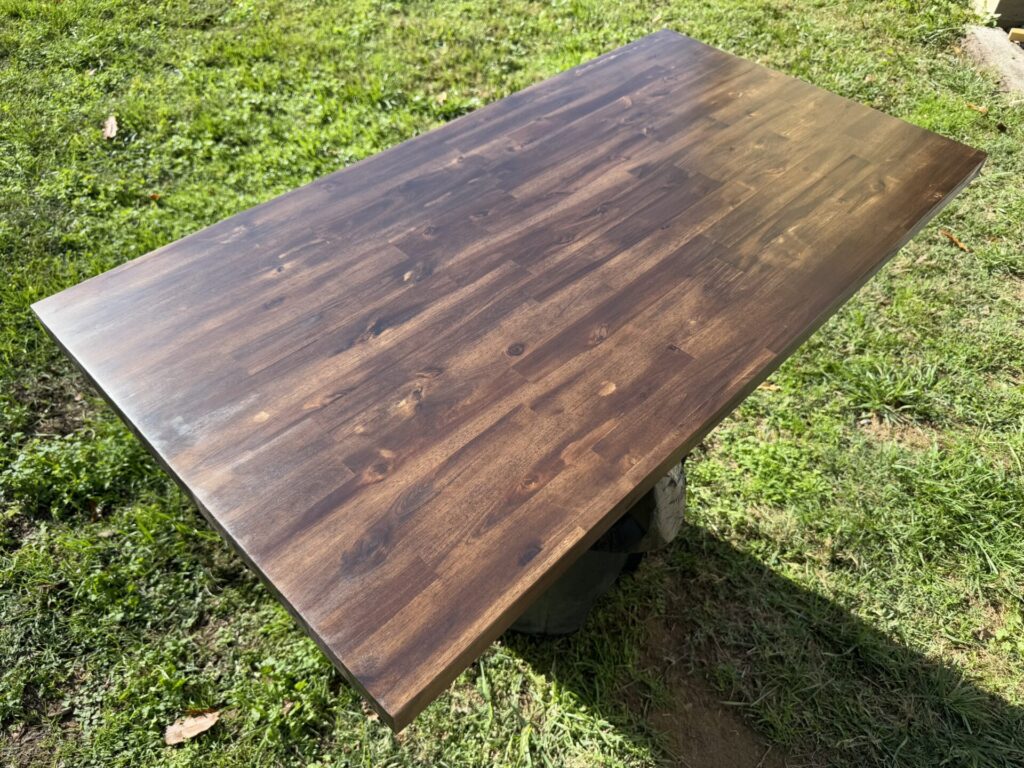
Well, in an effort to create kind of a dual-purpose setup – a sturdy desk for photographing stuff on which could also function as a desk for live-streaming and videos – I took a 2′ x 4′ section of acacia butcher block countertop and mounted it to a dual-motor standing desk to create one of my favorite things thus far.
This now functions not only as my main surface to photograph on – whether using the surface itself or placing another surface I’ve made on top of it – but also an excellent desk for future video work. The butcher block came already stained. It required a little bit of work, as I had to find a suitable protective coating for the stained butcher board, coat it multiple times, sanding in between, and get it all to a smooth finish. Then, I
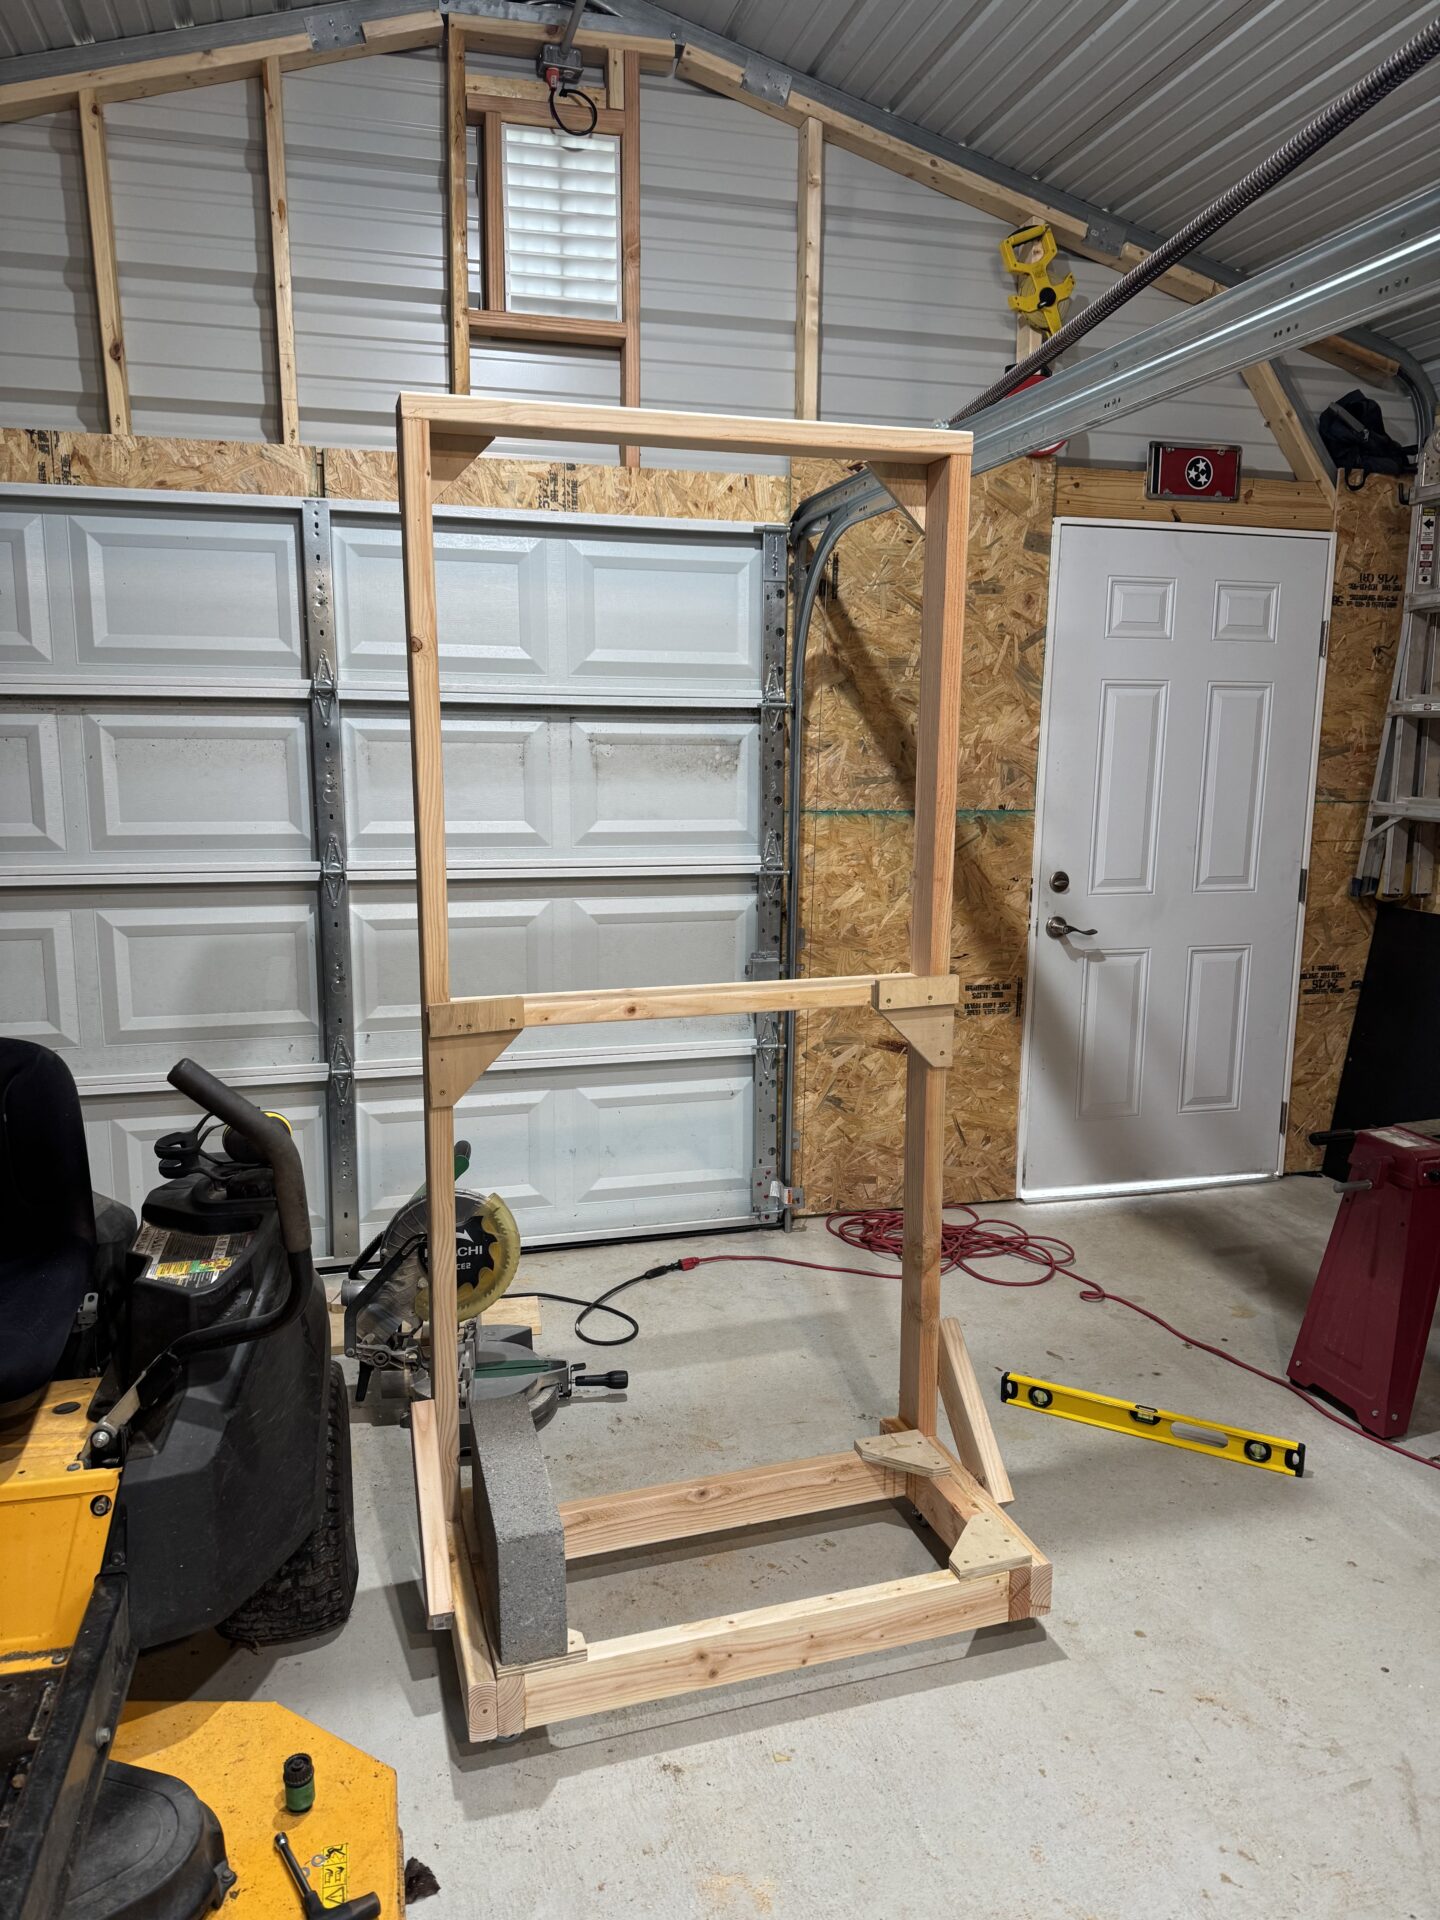
To work alongside that, I built a stand for holding my existing backdrops, and I designed it to hold the boards at a higher level to make photography easier, something I could stand to use instead of having to squat down or hang above overhead.
It is built out of 2×4’s, a few pieces of scrap wood here and there, and a couple half cinder blocks to act as an effective counterbalance to keep it from tipping over on the casters I installed, which make it super easy to roll around and move out of the way.
With that complete, I had one final project in mind before I would begin shooting – the brick wall.
Ever since I started food blogging this is a surface I’ve wanted to have, but it just didn’t seem practical. The challenge is this; when a desire just doesn’t go away, even a decade later, what do you do?
Eventually, you honor it, give in, and find a way to make it happen.
Building a Brick Wall
The root of this desire, I think, is either somewhere buried away deep in my childhood, and / or in my late teens. Growing up, I watched a ton of cooking shows with my mother. One of those that stood out to me was The Urban Peasant, a cooking show on CBC featuring James Barber, a Canadian cookbook author and TV show host.
Watch just the first minute or two of it, if you will.
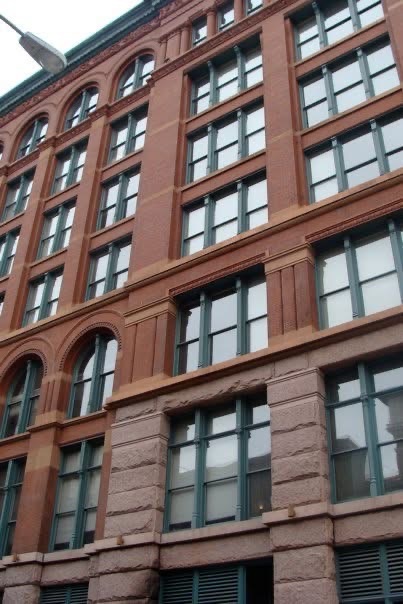
Anyone who knows me very well knows that I have a penchant for old brick warehouse loft conversions. Barber’s studio had the appearance of one, and it’s highly likely the early exposure to that dark yet warm soothing environment put something in my head to pursue that someday. If it wasn’t that, or perhaps was in part, it had to be my then first-person experience of touring a loft apartment complex in St. Louis somewhere around 2008. As a teenager going into his young adult years, I was primed and ready to get out of the rural area I’d grown up in and live in the big city. I still remember it, 1000 Washington Avenue, at that time called “The Merchandise Mart Apartments”, now called something else.
Since then, or whenever it was, that dimly lit warm brick wall has felt like home to me. It’s been a beautiful artistic backdrop for creativity.
When I committed to building this, I decided to make it a little larger than my other ones, because I wanted it to be able to function both as a larger but also a more distant backdrop. The goal was to be able to create the illusion of an dining table maybe two to four feet away from it, maybe with a plant of some kind in between things.
After some measurements, focal length, and field-of-view calculations, I decided on a 4′ tall by 6′ wide size. I did some weight estimations using thin-brick veneer, along with the necessary plywood backing, the Hardie board, and the frame itself. I designed the frame, made a cut and material list, and went to get it all.
Over the course of two recent weekends and a few weeknights in between, I built the frame, gluing and screwing everything together, attached the plywood panels, secured the Hardie board, laid the brick out to create an attractive pattern where similarly colored faces weren’t adjacent to one another, squeezed out adhesive, placed the bricks, and then grouted in between.
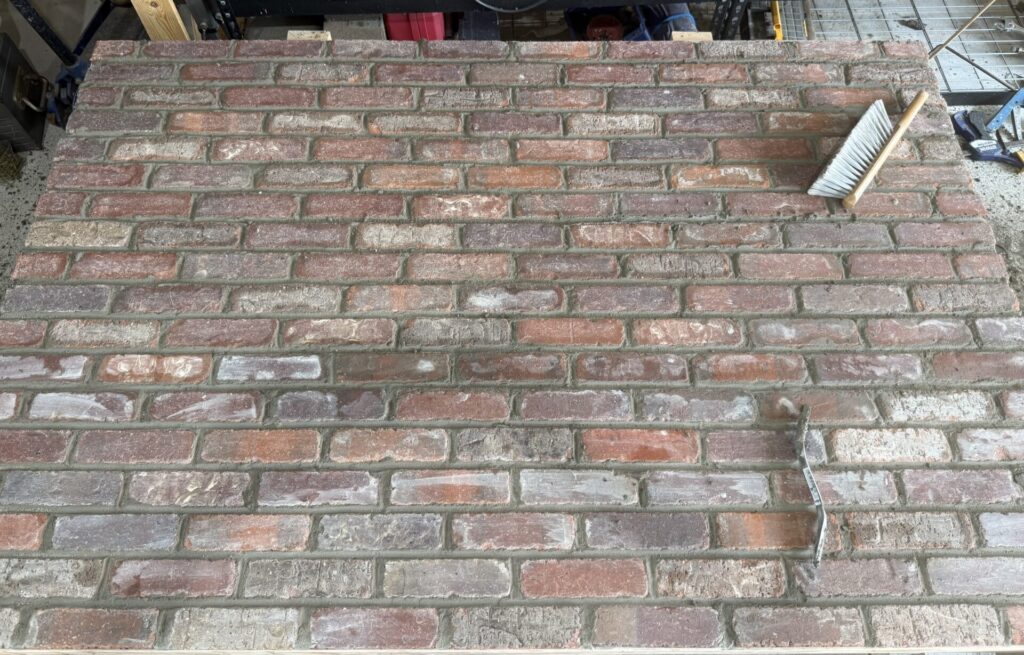
For anyone interested in specifics, I used 1/2″ pine plywood, with 1/4″ Hardie board, with Loctite PL Premium Max construction adhesive to adhere the tiles, and then Sakrete Type-N cement with fine sand I got at my local landscaping shop. I could not be any happier with how it turned out.
The critically important texture and the way that the depressions in the mortar will help to create accurate shadows depending on which way the light is placed will create a stunningly realistic ambiance, no matter whether it’s lit with bright, harsh sunlight pouring in through a large leaded glass warehouse window, or the dim glow of low-wattage uplights.
I will say, if I were doing it again, I would’ve been a bit more exacting on the weight estimations and probably made a couple concessions here and there in terms of the framing and materials itself. I do see a few places where I could’ve made some savings, although the reality is that when you have something heavy like brick – even in veneer form – Hardie board, the necessary plywood, and a frame capable of holding it all and remaining rigid and strong – it’s going to be heavy.
Conclusion
That’s all I’ve got to share for now. In future, I’ll have more shots of everything actually together, creating some of the scenes I’m aiming to produce. I’ll also spend a little more time talking about the style I’m looking to evoke, as well as from a philosophical standpoint, what I feel about food and its role in our lives beyond the mere basic task of sustaining life.
My goal or goals are numerous. I’d like, obviously, to create a stellar registry of excellent vegan recipes. I’d like to help show a different side of vegan or plant-based living, somewhat of a still healthy but much more seductive and alluring contrast to the typical bright, airy, ultra health-conscious stuff that people normally think of. I’d like to show that there is and certainly can be a richness to dishes, even in the absence of animal products.
I’d also like to take all of this and make it more accessible and approachable to people. I have plans to go beyond merely offering recipes, to publish a series of guides on building out and maintaining a light, but versatile pantry. As more of a “premium” offering down the road, there will be menus and shopping lists to help facilitate.
That was one of my earliest ideas, one that I actually brought over from the second time I worked on food blogging. It’s often not enough to simply give people good recipes. It helps a whole lot more if they also have a menu, an idea of how to put things together – a meal plan, really. It would also help an awful lot if the most difficult part for many people – the shopping – were made a little easier.
So, it will take some time, but all things do come in time. And I look forward to sharing more with you on those things, and also the development of it all, in the near future!